Mellanox Onyx, NSX Hardware VXLAN Gateway, version 3.7.1200, NSX 6.4.4
Article ID: 306108
Updated On:
Products
VMware NSX Networking
Issue/Introduction
This article provides information about Mellanox Spectrum SN2000 Series Switches Hardware VXLAN Gateway integration and compatibility with NSX.
Disclaimer: Mellanox Onyx referenced in this article is Mellanox’s network operating system that is developed and supported by Mellanox. Use of this product is also governed by the end user license agreement of Mellanox. You must obtain from Mellanox the OS, support, and the licensing for using this product. For more information, see Mellanox Technologies.
Disclaimer: Mellanox Onyx referenced in this article is Mellanox’s network operating system that is developed and supported by Mellanox. Use of this product is also governed by the end user license agreement of Mellanox. You must obtain from Mellanox the OS, support, and the licensing for using this product. For more information, see Mellanox Technologies.
Environment
VMware NSX for vSphere 6.4.x
Resolution
Mellanox Onyx version 3.7.1200
This paper is focused on Mellanox Onyx integration with VMware NSX.The Mellanox Onyx Advanced Ethernet Operating System delivers a new level of flexibility and scalability to next-generation data centers with storage, cloud, financial, or media & entertainment fabrics. Featuring a robust Layer 3 protocols stack, built-in workflow automation, monitoring & visibility tools, and high availability mechanisms, Onyx enables highly scalable leaf-spine deployments and simplifies network processes and workflows, increasing efficiencies and reducing operating expenses and time-to-service.
Onyx is running on Mellanox Spectrum series of switches and provides the VXLAN Tunnel End-Point (VTEP) network endpoint, enabling layer-2 overlay (tunneling) over layer-3 infrastructure between virtual and physical machines.
This common use case contains the following components:
- ESXi servers pre-configured with VXLAN networking using VMware NSX
- Network virtualization platform (NSX) controllers
- Mellanox Spectrum switch running VXLAN HW GW, connected to the ESXi servers and to physical servers
- Out-of-band network for management and a VLAN network to carry VXLAN traffic
Please refer to the steps below describing the setup of the solution.
VMware used the topology below as an example of a common setup where virtual machines running on top of ESXi servers communicate to a database server over VXLAN.
Mellanox Onyx – Switch Configuration
- Set MTU to Jumbo frames on the relevant switch ports (This should be aligned with the ESXi servers and database server). Run:
switch (config) # interface ethernet 1/1-1/3 mtu 9216 force
- Create VLAN 3 to carry VXLAN traffic. Run:
switch (config) # vlan 3
- Set the switch interfaces towards the ESXi servers to be part of VLAN 3 in trunk mode. Run:
switch (config) # interface ethernet 1 switchport mode trunk
switch (config) # interface ethernet 2 switchport mode trunk
- Enable IP routing. Run:
switch (config) # ip routing vrf default
- Create a VLAN interface and assign it an IP address.
The IP address needs to be the default gateway of the "vxlan" netstack created by NSX after enabling VXLAN traffic on the hosts.
Note: The traffic can be routed between the ESXi servers and the Spectrum switch through other routers, in this example we directly connect the Spectrum switch to the ESXi servers.
switch (config) # interface vlan 3
switch (config) # interface vlan 3 ip address 33.33.33.254 255.255.255.0
switch (config) # interface vlan 3 mtu 9216
Note: To check the default gateway in vSphere web client, select an ESXi host and go to Configure -> TCP/IP configuration.
- Create a loopback interface. This interface will be the VTEP IP address assigned to this switch, which will communicate with the VTEPs on the ESXi servers by routing through "interface vlan 3". Run:
switch (config) # interface loopback 1
switch (config) # interface loopback 1 ip address 1.2.3.4 255.255.255.255
- Enable the Network Virtualization Edge (NVE) protocol, create an NVE interface, and specify that it is the source interface (loopback 1). The following commands enable VTEP on the switch and assign loopback1 as the interface to handle all Tx/Rx VXLAN traffic. Run:
switch (config) # protocol nve
switch (config) # interface nve 1
switch (config) # interface nve 1 vxlan source interface loopback 1
- Start the ovsdb server and connect it to the NSX controllers. Run:
switch (config) # ovs ovsdb server
switch (config) # ovs ovsdb manager remote ssl ip address 10.130.200.100
switch (config) # ovs ovsdb manager remote ssl ip address 10.144.200.101
switch (config) # ovs ovsdb manager remote ssl ip address 10.144.200.102
- Configure the port facing the database server as an NVE port. Run:
switch (config) # interface ethernet 1/3 nve mode only force
Note: The mode "switchport" is controlled via the NSX Controller and cannot be configured manually once the port is in NVE mode.
- Obtain the switch certificate. You will need this certificate when you configure NSX Manager later.
switch (config) # show crypto certificate name system-self-signed public-pem
...
Copy the certificate starting with the line:
-----BEGIN CERTIFICATE-----
Until the line:
-----END CERTIFICATE-----
Make sure to include both of those lines.
NSX Controller Configuration
Add the Spectrum SwitchThis section describes how to configure the NSX Controller to add the Spectrum switch.
- Add hosts to the replication cluster. Go to "Service Definitions" and select "Hardware Devices", Under "Replication Cluster", click Edit. Add the two ESXi servers to the replication cluster.
Note: All hosts you add to the replication cluster can replicate Broadcast, Unknown unicast and Multicast (BUM) traffic to other ESXi servers. When the switch needs to send BUM traffic to a virtual machine, it will select one of the hosts in the replication cluster and send the traffic to it. The host will then replicate it to all other ESXi hosts.
Note: It is recommended that you add at least two ESXi servers to the replication cluster for redundancy.
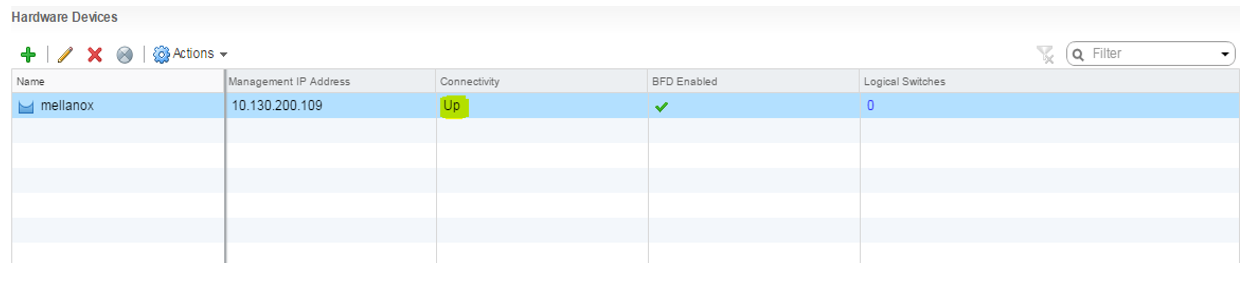
- Add the Mellanox Spectrum switch to NSX.
Under the Hardware Devices tab click the plus sign to add a new hardware device. Enter a name for the new hardware device. Enter the switch certificate obtained earlier, and click OK.
Wait until the new switch is showing as "UP" under the Connectivity column. You might need to refresh the vSphere client a few times.
Map a Logical Switch to a Physical Port
Map a Logical Switch to a Physical Port
- In NSX Manager select "Logical Switches". Right click the logical switch which you want to map to the physical switch port and select "Manage Hardware Bindings".
Note: The segment ID is the VNI.
- Click the plus sign to add a new mapping. Click Select under the port column and select port "eth3". This corresponds to “interface ethernet 1/3" you configured earlier as an NVE port in the switch. Under the VLAN column, set the VLAN that will map this logical switch to this specific switch port. You can have multiple logical switches mapped to the same port on a different VLAN (for example to connect a firewall appliance to logical switches).
Note: For an "access" (untagged) configuration use VLAN 0 and click OK. In this case, we have no VLAN configured on the database server, therefore we choose VLAN 0.
Verification
- Configure the required IP address on the database server in the same subnet as the virtual machines in the logical switch.
Note: If you used a VXLAN in the previous step also configure the VLAN in the database server OS.
- Ping between a virtual machine connected to the logical switch and the database server.
- On the switch, run:
switch (config) # show interfaces nve 1 mac-address-table
NVE Interface Logical Switch VNI ID Mac Address Address Type Remote Endpoint IP Address
------------- -------------- ------ ----------- ------------ --------------------------
1 240ac937-1ec2-371a-a 5002 00:50:56:99:33:09 remote configured 33.33.33.1
1 240ac937-1ec2-371a-a 5002 00:50:56:99:98:14 remote configured 33.33.33.2
You should see the MAC addresses of all the virtual machines in the connected logical switch and the MAC address of the database server.
- Check the NVE Interface for status and counters.
switch (config) # show interfaces nve
Remote Manager IP Address Port Connection Type
------------------------- ---- ---------------
10.130.200.100 6640 ssl
10.144.200.101 6640 ssl
10.144.200.102 6640 ssl
Interface NVE 1 status:
Admin state: up
Source interface: loopback 1
NVE member interfaces: Eth1/1
0 encapsulated (Tx) NVE packets
0 decapsulated (Rx) NVE packets
0 dropped NVE-encapsulated packets
0 NVE-encapsulated packets with errors
- Get the peer list per VNI.
switch (config) # show interfaces nve 1 peers
NVE Interface Logical Switch VNI ID Peer IP Address
------------- -------------- ------ ----------------
1 415585bd-389b-3965-9 5002 33.33.33.1
1 415585bd-389b-3965-9 5002 33.33.33.2
Note: Refer to Mellanox Onyx User Manual for full list of commands.
Troubleshooting
Please refer to the Onyx User Manual for logs, procedures techniques, and other general switch debugging guide.
Common Configuration Issues
Please refer to the Onyx User Manual for logs, procedures techniques, and other general switch debugging guide.
Common Configuration Issues
- Issue: Under “Hardware devices” the added switch stays in a down state.
Possible causes:
a. The certificate from the switch is incorrect or missing.
Solution:
Get the certificate from the switch.
Edit the switch entry in “Hardware devices” and paste the certificate.
b. There is no connectivity between the switch management network and the NSX controllers.
Solution:
Check management network connectivity by pinging from the switch to the IP addresses of the NSX controllers.
- Issue: There is no traffic between virtual machines and the physical servers behind NVE ports.
Possible causes:
a. There is no connectivity between the switch loopback IP address and the VTEP IP addresses on the ESXi servers.
Solution:
Make sure the physical connectivity between the switch and the ESXi servers is correct.
b. If a VLAN was used to map the logical switch to the NVE port, there might be a VLAN mismatch between the mapping and the physical server.
Solution:
Make sure the VLAN set on the NVE port for the logical switch is also configured on the physical servers OS.
- Mellanox Onyx User Manual: Please refer to section 5.13 describing the Onyx VXLAN solution, and specifically to section 5.13.2, "VMware Network Virtualization and Security Platform (NSX) Configuration", describing the integration between Onyx and VMware NSX.
- Mellanox support account (MyMellanox) can be created by registering on the following link: https://mymellanox.force.com/support/CommunitiesSelfReg.
- The latest Onyx release can be downloaded from the link below using your MyMellanox credentials: https://mymellanox.force.com/support/supportproductitem?id=a2v50000000Jlgf.
- Please refer to the Onyx User Manual for software upgrade instructions.
- Please refer to the “Mellanox Support and Services User Guide” for information regarding the support process, SLA, escalation process, and contact information in a detailed and organized manner.
Feedback
Yes
No
Powered by
