Increasing the disk space for the vCenter Server Appliance in vSphere 6.5, 6.7, 7.0 and 8.0
Article ID: 316602
Updated On:
Products
VMware vCenter Server
Issue/Introduction
This article provides steps to increase the disk space of a specific VMDK for the vCenter Server Appliance (VCSA) 6.5, 6.7, 7.0 and 8.0. With the introduction of Logical Volume Management (LVM) in vSphere 6.0 and continued support with vSphere 6.5, 6.7, 7.0 and 8.0, the vCenter Server disks can be dynamically increased.
For more information on the disk layout of vCenter Server, see:
Notes:
vCenter Server Appliance File-Based Restore
For more information on the disk layout of vCenter Server, see:
- List of VMDKs for a vCenter Server Appliance 6.5 - Size Mount point and Purpose
- List of VMDKs/Partitions for a vCenter Server Appliance 6.7 - Size Mount point and Purpose
- List of VMDKs/Partitions for a vCenter Server 7.0 - Size Mount point and Purpose
- List of VMDKs/Partitions for a vCenter Server 8.0 - Size Mount point and Purpose
Notes:
- Resizing the root partition (VMDK1 listed in the KB above) is not supported on 6.5. See the vSphere 6.5 Release Notes for more information.
- Resizing root partition has been added to 6.7.
- Resizing root partition is not supported on 7.0 and above.
- This KB is also relevant for SEAT partition full or any other vCenter appliance partition full issues.
- This KB also applies to external Platform Service Controllers [PSC]
- If the vCenter/PSC is inaccessible, connect directly to the ESXi host running the virtual machine.
- If extending VMDK size option is greyed out, the disk may be running on snapshots, or the disk may be at the maximum allowed size depending on the block size of the datastore. Remove any snapshots attached to the vCenter VM before progressing and ensure a full file-level backup of the vCenter before extending any partitions.
Information on VMware Natively Supported File-Based Backup
File-Based Backup and Restore of vCenter Server AppliancevCenter Server Appliance File-Based Backup/Restore Walkthroughs
vCenter Server Appliance File-Based BackupvCenter Server Appliance File-Based Restore
Environment
VMware vCenter Server Appliance 6.7.x
VMware vCenter Server 7.0.x
VMware vCenter Server 8.0
VMware vCenter Server Appliance 6.5.x
VMware vCenter Server 7.0.x
VMware vCenter Server 8.0
VMware vCenter Server Appliance 6.5.x
Resolution
To increase the disk space
- Power off the vCenter Server VM. If the VM is inaccessible, then do this from ESXi host level
- Right-click the VM.
- Click Edit Settings.
- Select Virtual Disk.
- Increase the size of the disk. Ensuring there is no snapshot attached to VM.
- Power on VM
- Use the BASH Shell or Appliance Management CLI o expand the partition(s).
Mapping vCenter Logical Volume to real harddisk
- Run this command to find the logical volume mapping to partition
lsblk -o NAME,HCTL,MOUNTPOINT,SIZE
- Get the realpath PCI device details for each device
ls -al /sys/block/sd*
- Identify the partition that need to be increased, for example let's take /storage/lvm_snapshot which maps to logical volume /sys/block/sdq
- Find the SCSI label for the PCI device
cat /sys/devices/pci0000:00/0000:00:11.0/0000:02:00.0/label
Note: If the device realpath which we get in step2 is not having serial number format before the host folder (4th folder level) then that maps to SCSI0, for example /sys/devices/pci0000:00/0000:00:10.0/ maps to SCSI0
Mapping SCSI device.
- Now we know that the partition /sys/block/sdq is mapped to SCSI device 1 and Unit number 1 (From the 3rd part of HCTL from output of step1), which means it maps to SCSI(1:1).
Increase disk space using BASH Shell
Note: Ensure there is a no snapshot attached to vCenter Server VM
- Log in to the vCenter Server Appliance using SSH and root credentials.
- Run this command to enable the Bash shell:
shell.set --enabled true
- Type shell and press Enter.
- Use these commands to verify which disk is experiencing disk capacity issues, then trace which SCSI ID will show in the VM edit settings:
df -h; lsblk; lsscsi
For example, if the following command results in the execution of
/storage/log corresponds to sde and the SCSI ID is SCSI(0:4).
The virtual hard disk displayed as SCSI(0:4) in the virtual device node in the virtual machine settings of vsphere client corresponds to the /storage/log disk.
-----------------
:
/dev/mapper/log_vg-log 9.8G 4.4G 5.0G 47% /storage/log
:
sdd 8:48 0 25G 0 disk
mqcore_vg-core 254:12 0 25G 0 lvm /storage/core
★sde 8:64 0 10G 0 disk
★ mqlog_vg-log 254:14 0 10G 0 lvm /storage/log
sdf 8:80 0 10G 0 disk
mqdb_vg-db 254:5 0 10G 0 lvm /storage/db
:
[2:0:3:0] disk VMware Virtual disk 1.0 /dev/sdd
★[2:0:4:0] disk VMware Virtual disk 1.0 /dev/sde
[2:0:5:0] disk VMware Virtual disk 1.0 /dev/sdf
----------------- - Using the vSphere Client or vSphere Web Client, locate the vCenter Server Appliance virtual machine and increase the disk space on the affected virtual disk. For more information, see Increasing the size of a virtual disk (1004047).
- After the virtual disk is increased, return to the SSH session and run this command to automatically expand any logical volumes for which the physical volumes are increased:
/usr/lib/applmgmt/support/scripts/autogrow.sh
- Run this command to confirm that the virtual disk has successfully grown:
df -h
Increase disk space using Appliance Management CLI
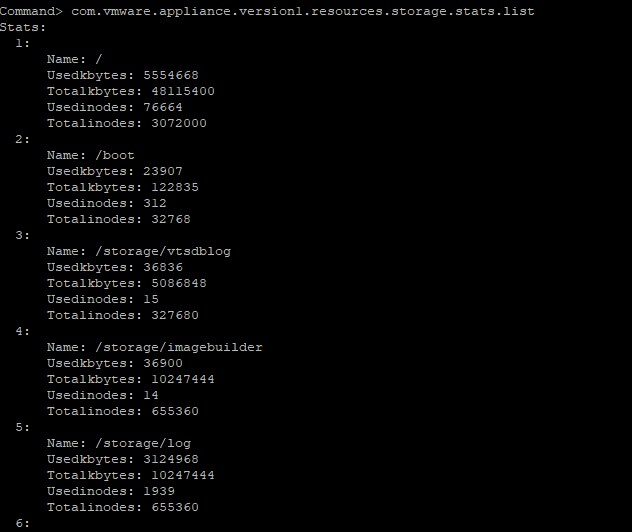
Note: The commands: com.vmware.appliance.version1.resources.storage.stats.list has to be executed from the Command > location and the command does not work if you have entered inside the shell prompt.
Command ran successfully:
Failed command: Ensure command is ran in correct environment

Command ran successfully:
Failed command: Ensure command is ran in correct environment
- Log in to the vCenter Server Appliance using SSH and root credentials.
- Run this command to verify which disk is experiencing disk capacity issues:
For vCenter Server Appliance 6.5:
com.vmware.appliance.version1.resources.storage.stats.list
For vCenter Server Appliance 6.7:
com.vmware.appliance.version1.resources.storage.stats.list
com.vmware.appliance.version1.resources.storage.stats.list
You see an output similar to:
...
7:
Totalinodes: 655360
Usedinodes: 4211
Name: /storage/seat
Totalkbytes: 10181944
Usedkbytes: 9081843
...
For vCenter Server Appliance 7.0, execute the BASH Shell procedure instead.
For vCenter Server Appliance 7.0, execute the BASH Shell procedure instead.
- Using the vSphere Client or vSphere Web Client, locate the vCenter Server Appliance virtual machine and increase the disk space on the affected virtual disk. For more information, see Increasing the size of a virtual disk (1004047).
- After the virtual disk is increased, return to the SSH session and run this command to automatically expand any logical volumes for which the physical volumes are increased:
For vCenter Server Appliance 6.5:
com.vmware.appliance.version1.system.storage.resize
For vCenter Server Appliance 6.7:
com.vmware.appliance.system.storage.resize
For vCenter Server Appliance 6.7:
com.vmware.appliance.system.storage.resize
- Run the command again to confirm that the virtual disk has been successfully grown:
For vCenter Server Appliance 6.5:
com.vmware.appliance.version1.resources.storage.stats.list
For vCenter Server Appliance 6.7:
com.vmware.appliance.version1.resources.storage.stats.list
You see an output similar to:
...
7:
Totalinodes: 786432
Usedinodes: 4211
Name: /storage/seat
Totalkbytes: 12246192
Usedkbytes: 9081843
...
7:
Totalinodes: 786432
Usedinodes: 4211
Name: /storage/seat
Totalkbytes: 12246192
Usedkbytes: 9081843
Additional Information
VMware Skyline Health Diagnostics for vSphere - FAQ
This article is explicitly for vSphere 6.5, 6.7 and 7.0. If you are using the vCenter Server or Platform Services Controller Appliances 6.0 or 5.x, see:
Increasing the size of a virtual disk
Increasing the disk space in vCenter Server Appliance 5.x
Increasing the disk space for the VMware vCenter Server Appliance in vSphere 6.0
vSphere 6.5 の VMware vCenter Server Appliance のディスク容量を増やす
增加 vSphere 6.5 中 VMware vCenter Server Appliance 的磁盘空间
Vergrößern des Festplattenspeichers für die VMware vCenter Server Appliance in vSphere 6.5
This article is explicitly for vSphere 6.5, 6.7 and 7.0. If you are using the vCenter Server or Platform Services Controller Appliances 6.0 or 5.x, see:
- Increasing the disk space for the VMware vCenter Server Appliance in vSphere 6.0 (2126276)
- Increasing the disk space in vCenter Server Appliance 5.x (2056764)
Increasing the disk space in vCenter Server Appliance 5.x
Increasing the disk space for the VMware vCenter Server Appliance in vSphere 6.0
vSphere 6.5 の VMware vCenter Server Appliance のディスク容量を増やす
增加 vSphere 6.5 中 VMware vCenter Server Appliance 的磁盘空间
Vergrößern des Festplattenspeichers für die VMware vCenter Server Appliance in vSphere 6.5
Feedback
Yes
No
Powered by
