Generating certificates for use with the VMware SSL Certificate Automation Tool
Article ID: 307497
Updated On:
Products
VMware vCenter Server
Issue/Introduction
This article provides information on configuring Certificate Authority (CA) signed SSL certificates for use with the SSL Certificate Automation Tool. The tool helps eliminate common causes for problems with the creation of the certificates, including configuration steps and details, and helps avoid common configuration issues which cause failures while implementing custom certificates with the tool.
Note: This article is specifically for vSphere 5.1 and vSphere 5.5 when using the SSL Certificate Automation Tool.
Note: This article is specifically for vSphere 5.1 and vSphere 5.5 when using the SSL Certificate Automation Tool.
If you are using vSphere 5.1, see Deploying and using the SSL Certificate Automation Tool 5.1 (2041600).
If you are using vSphere 5.5, see Deploying and using the SSL Certificate Automation Tool 5.5 (2057340).
If you are implementing certificates manually, see Implementing CA signed SSL certificates with vSphere 5.x (2034833).
Environment
VMware vCenter Server 5.1.x
VMware vCenter Server 5.5.x
VMware vCenter Server 5.5.x
Resolution
Creating CA signed certificates for vSphere is a complex task. Therefore, VMware has worked to simplify the process by creating a tool to help automate the process. Before you can run the tool, however, you must have correctly created certificates to be able to utilize the tool. This article provides the steps to create the appropriate certificates. The steps are:
Remember that each component of the vCenter Server configuration requires its own certificate. Before attempting these steps, ensure that:
As of the SSL Certificate Automation tool version 1.0.1, the certificate requests can be created directly from the tool, automating many manual steps. For more details on manually creating the requests rather than generating them from the tool, see the Additional Information section of this article.
When creating the requests, the SSL Certificate Automation Tool ensures that by default the requests have the proper uniqueness. The requirements for the certificate requests are that they:
For Commercial CAs, to create each certificate request:
- You have a vSphere 5.1 or vSphere 5.5 environment.
- The environment has been pre-installed for all components for which you will be installing certificates.
Generating Certificate Requests
There are seven separate components in vCenter Server 5.1 and 5.5 that utilize certificates to encrypt communication. This article can be used if the components are on the same server and if they are on different servers, as long as you have a separate certificate for each component.As of the SSL Certificate Automation tool version 1.0.1, the certificate requests can be created directly from the tool, automating many manual steps. For more details on manually creating the requests rather than generating them from the tool, see the Additional Information section of this article.
When creating the requests, the SSL Certificate Automation Tool ensures that by default the requests have the proper uniqueness. The requirements for the certificate requests are that they:
- Have the subject alternative name field included in them.
- Have unique Subject Distinguished Name (DN) for the certificate. The SSL Certificate Automation tool uses
OrganizationalUnitNamesfor the components to achieve this uniqueness. - Include
digitalSignature,keyEncipherment, anddataEnciphermentcomponents for Key Usage.
- From a command line, navigate to the location where you unzipped the tool.
- Run this command:
ssl-updater.bat
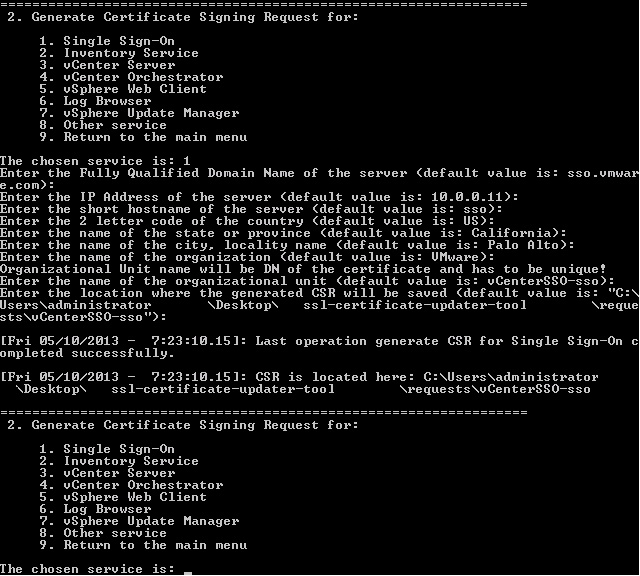
- From the SSL Certificate Automation tool, select Option 2 to Generate Certificate Requests.
Note: VMware recommends that the certificate request (and consequently the private key) are generated on the system which is being used for the service.
- Select the option for the service you are generating the certificate request for.
- Enter the information requested for the certificate request. By default the SSL Certificate Automation tool automatically populates much of the information required. The following is a description of the information requested:
- DNS Name - the fully qualified domain name of the server. For example:
server.domain.com - IP address - the IP address of the server. For example:
10.0.0.10 - Short name - the short hostname of the server. For example:
server - Country - the two digit country code. For example:
US - State or Province - The state or province for the certificate. For example:
California - City or Locality - The city for the certificate. For example:
Palo Alto - Organization - The name of the organization for the certificate. For example:
VMware - Organizational Unit name - The organizational unit name for the certificate. By default VMware specifies a default value of and uses it to ensure that the DN of the certificate is unique. Do not change this unless there is another field which makes the DN of the certificate unique.
Note: Unique DNs are a hard requirement for vSphere 5.1. vCenter Single Sign-On uses the certificates to ensure that communication details are secure.
- Enter the directory where the CSR will be saved. By default, the CSRs and KEYs are saved in the
SSL-TOOL-DIRECTORY\Requestsdirectory.
Important: Ensure that the directory in which the SSL Certificate Automation Tool is extracted and the specified CSR directory above do not have spaces in the names or CSR Generation will fail.
- Repeat steps 2 and 3 for each service which you are generating a certificate for.
- DNS Name - the fully qualified domain name of the server. For example:
This is a sample configuration for vCenter Single Sign-On:
After completing this section, you now have the
After completing this section, you now have the
rui.csr and rui.key files located in each of the respective directories as specified for the different services.Important: When generating a certificate request, the private key (rui.key) is also generated. The private key is the sensitive data for the certificate, and as such VMware recommends that you generate each certificate request, and consequently the private key, on the system which it is to be used.
To validate that the CSR is created properly, run the command:
C:\OpenSSL-Win32\bin>openssl req -in \rui.csr -noout -text
C:\OpenSSL-Win32\bin>openssl req -in \rui.csr -noout -text
Note: The above uses the default path to the OpenSSL tool. If another path was used please substitute.
Alternatively, in a Windows Server on which vCenter Server is installed, run this command from the command prompt:
Alternatively, in a Windows Server on which vCenter Server is installed, run this command from the command prompt:
C:\Program Files\VMware\Infrastructure\Inventory Service\bin\openssl.exe req -in rui.csr -noout -text
After running the command, verify the output to ensure that all of the parameters entered in the tool are properly set.
After running the command, verify the output to ensure that all of the parameters entered in the tool are properly set.
Note: The SSL Certificate Automation tool uses RFC standard formatting for the CSR. As a result the Subject Alternate name uses IP: syntax for the IP address. This prevents issues with certificate verification during operation of the product, however does not suppress the certificate warming when navigating to the IP address of the service from the vSphere Client and the Internet Explorer Browser. This is an issue with how certificates are recognized in the Microsoft Certificate Store. Ignore the error, or navigate to the Fully Qualified Domain name to avoid the error.
Proceed to the Obtaining the certificate section to obtain the certificate.
Proceed to the Obtaining the certificate section to obtain the certificate.
Obtaining the Certificate
After the certificate request is created, it must be given to the certificate authority for generation of the actual certificate. The authority presents a certificate back and a copy of their root certificate. For the certificate chain to be trusted, the root certificate must be installed on the server. Follow the appropriate section below for the steps for the certificate authority in question.For Commercial CAs, to create each certificate request:
Note: Wild card certificates are not supported.
Note :
After completing this section, proceed to the Creating the PEM files section.
Note: If they are out of order, the validation of the certificate chain will fail.
To create the chain:
- Take the certificate request (
rui.csr, as generated above) and send it to the authority in question. - The authority sends back the generated certificate.
Note :
- Based on the requirements of the key, ensure that the WebServer Template has been copied to allow for encryption of user data. This can be normally found in Certificate Manager > Extensions > Key Usage > Allow encryption of user data.
- By default, the MS Web Server template does not have Client Authentication enabled.The Certificate Template being used must have both Client Authentication and Server Authentication enabled.
- Log in to the Microsoft CA certificate authority Web interface. By default, it is
http://servername/CertSrv/. - Click the Request a certificate link.
- Click advanced certificate request.
- Click the Submit a certificate request by using a base-64-encoded CMC or PKCS #10 file, or submit a renewal request by using a base-64-encoded PKCS #7 file link.
- Open the certificate request in a plain text editor and paste the text from the Begin to the End request into the Saved Request box:
-----BEGIN CERTIFICATE REQUEST-----to-----END CERTIFICATE REQUEST-----
Note: Do not copy the actual-----BEGIN CERTIFICATE REQUEST-----to-----END CERTIFICATE REQUEST-----.Only copy the text in between these lines. You may see = (equal) signs near the Begin and End lines (for example, ==-----END). In this case, you must copy the = (equal) signs.
- Select the Certificate Template as the appropriate Web Server template. This is generally a copy of the Web Server Template with Allow encryption of user data setting set.
- Click Submit to submit the request.
- Click Base 64 encoded on the Certificate issued screen.
- Click the Download Certificate link.
- Save the certificate as
rui.crtin the appropriatec:\certs\folder. - Repeat steps 2 to 10 for each additional service.
- Navigate back to the home page of the certificate server and click Download a CA certificate, certificate chain or CRL.
- Click the Base 64 option.
- Click the Download CA Certificate chain link.
- Save the certificate chain as
cachain.p7bin thec:\certsfolder. - Double-click the
cachain.p7bfile and navigate to C:\certs\cachain.p7b > Certificates. - Right-click the certificate listed and click All Tasks > Export.
- Click Next.
- Select Base-64 encoded X.509 (.CER), then click Next.
- Save the export to
C:\certs\Root64.cerand click Next.
Note: This assumes there are no intermediate certificates in the Certificate Authority. Before exporting the certificate into Base-64 encoded X.509 (.CER), if there are two or more levels in the Certificate Authorities and if you have multiple certificates on the.p7bfile, you will not be able to export them to Base64 at the same time. You must export them one by one instead. For example, create files namedC:\certs\Root64-1.cer,C:\certs\Root64-2.cer, etc.
- Click Finish.
To verify that all of the settings are correct, double-click the
Note: If you have intermediate certificates, you should have a
rui.crt file and validate that the proper alternative names and subjects are in each certificate. When complete, the certificates are generated and you now have the rui.crt file for each service and the Root64.cer root certificate.Note: If you have intermediate certificates, you should have a
root64-#.cer file for each intermediate certificate all the way to the root certificate.Install the root certificate into the Trusted Root Certificate Authorities > Local Computer certificate store on each Windows system which has a service installed or which will be used to connect a client to the services. If you are using intermediate certificates you should install them into the Intermediate Certificate Authorities > Local Computer certificate store.
Note: There should be no text before the -----BEGIN CERTIFICATE----- or after the -----END CERTIFICATE----- in the .crt, or .cer files.
After completing this section, proceed to the Creating the PEM files section.
Creating the PEM files
Once the certificates and keys are created, you must create a PEM certificate chain for each certificate. The chain must contain all certificates in the chain, in the order in which they lead to the root certification authority.Note: If they are out of order, the validation of the certificate chain will fail.
To create the chain:
- Create a file called
chain.pem, located in the folder for the service that you are creating the chain for. - Open the
rui.crtfile in Notepad and copy the contents of the file into thechain.pemfile for that service. - Open the
Root64.cerfile in Notepad and paste the contents of the file into thechain.pemfile right after the certificate section. Be sure that there is no whitespace in the file in between certificates.
Note: Complete this action for each intermediate certificate authority as well.
- Once complete, the file looks similar to this example:
Note: The certificates shown in this example are truncated for ease of reading with the text added to the right indicating the order in which the certificates should be pasted into the file. Do not copy this example or add the text to your.pemfile. Ensure there are no spaces before or after any of the -----BEGIN CERTIFICATE----- or -----END CERTIFICATE----- lines.
-----BEGIN CERTIFICATE-----
	MIIFxTCCBK2gAwIBAgIKYaLJSgAAAAAAITANBgkqhkiG9w0BAQUFADBGMRMwEQYK
	CZImiZPyLGQBGRYDbmV0MRYwFAYKCZImiZPyLGQBGRYGbW5uZXh0MRcwFQYDVQQD
	Ew5tbm5leHQtQUQtMS1DQTAeFw0xMzAyMDExNjAxMDNaFw0xNTAyMDExNjExMDNa SMhYhbv3wr7XraAnsIaBYCeg+J7fKTFgjA8bTwC+dVTaOSXQuhnZfrOVxlfJ/Ydm
	NS7WBBBFd9V4FPyRDPER/QMVl+xyoaMGw0QKnslmq/JvID4FPd0/QD62RAsTntXI
	ATa+CS6MjloKFgRaGnKAAFPsrEeGjb2JgMOpIfbdx4KT3WkspsK3KPwFPoYza4ih
	4eT2HwhcUs4wo7X/XQd+CZjttoLsSyCk5tCmOGU6xLaE1s08R6sz9mM=
	-----END CERTIFICATE-----
	-----BEGIN CERTIFICATE-----
	MIIDZzCCAk+gAwIBAgIQNO7aLfykR4pE94tcRe0vyDANBgkqhkiG9w0BAQUFADBG
	K73RIKZaDkBOuUlRSIfgfovUFJrdwGtMWo3m4dpN7csQAjK/uixfJDVRG0nXk9pq
	GXaS5/YCv5B4q4T+j5pa2f+a61ygjN1YQRoZf2CHLe7Zq89Xv90nhPM4foWdNNkr /Esf1E6fnrItsXpIchQOmvQViis12YyUvwko2aidjVm9sML0ANiLJZSoQ9Zs/WGC
	TLqwbQm6tNyFB8c=
	-----END CERTIFICATE-----
- Save and close the file.
- Repeat these steps for each service for which you are replacing the certificate.
rui.key and chain.pem files for each service you are implementing custom certificates for. Copy these files to the appropriate server for use with the SSL Certificate Automation Tool.Additional Information
As of version 1.0.1 of the SSL Certificate Automation Tool, the certificate requests can be generated directly from the tool. If for some reason, you are not able to use the automated process in the tool, the manual steps can still be used as noted below.
Important: OpenSSL version 0.9.8 must be used.
The OpenSSL configuration when generating requests must:
In the
Note: Each SSL Certificate requires a unique Distinguished Name (DN). The examples in this article use the
Note: At least one
To generate the certificate requests:
After running the command, verify the output to ensure that all of the parameters entered in the
Proceed to the Obtaining the certificate section in the Resolution area of this article.
Deploying and using the SSL Certificate Automation Tool 1.0.x
Deploying and using the SSL Certificate Automation Tool 5.5
使用する証明書を VMware SSL Certificate Automation Tool で生成する
生成证书以与 VMware SSL 证书自动化工具结合使用
Creating the OpenSSL configuration files manually
There are seven separate components in vCenter Server 5.1 that utilize certificates to encrypt communication. This article can be used if the components are on the same server and if they are on different servers, as long as you have a separate certificate for each component.
If generating certificates manually, the latest version of OpenSSL v0.9.8 must been downloaded from Shining Light Productions and has been installed in the default directory. This article assumes it has been installed in
C:\OpenSSL-Win32. If it has been installed elsewhere, substitute the alternative location appropriately.Note: The preceding link was correct as of March 17, 2015. If you find the link is broken, provide feedback and a VMware employee will update the link.
Important: OpenSSL version 0.9.8 must be used.
The OpenSSL configuration when generating requests must:
- Have the subject alternative name field included in them
- Have unique
OrganizationalUnitNamesfor the components - Include
digitalSignature,keyEncipherment, anddataEnciphermentcomponents for Key Usage
C:\certs folder as an example.In the
C:\certs folder, create seven other folders so that you can organize each of the certificates. These steps use these seven folders:
InventoryServiceSSOvCenterWebClientLogBrowserUpdateManagerOrchestrator
Note: Each SSL Certificate requires a unique Distinguished Name (DN). The examples in this article use the
OrganizationalUnitName (OU) field to achieve this uniqueness, based on a configuration where all components are installed on the same server. If the services are all on separate servers, they have a unique DN by default.
The procedure below provides detailed step-by-step instructions for the creation of each of the unique requests if you want to implement custom certificates for all components. They include the detailed changes which are required to be made in each certificate file to achieve the uniqueness required.[ req ]
default_bits = 2048
default_keyfile = rui.key
distinguished_name = req_distinguished_name
encrypt_key = no
prompt = no
string_mask = nombstr
req_extensions = v3_req
[ v3_req ]
basicConstraints = CA:FALSE
keyUsage = digitalSignature, keyEncipherment, dataEncipherment
extendedKeyUsage = serverAuth, clientAuth
subjectAltName = DNS:vc51-1, IP:10.0.0.10, DNS:vc51-1.vmware.com
[ req_distinguished_name ]
countryName = US
stateOrProvinceName = NY
localityName = New York
0.organizationName = VMWare
organizationalUnitName = vCenterInventoryService
commonName = vc51-1.vmware.com
Note: The country name is always the two digit country code for the country.
Note: At least one
subjectAltName should be in place for each server that matches the commonName field. You do not need to include the IP address as a subjectAltName if policies prohibit the use of it, but this configuration is recommended by VMware.- For the Inventory Service, create a file in
C:\certs\InventoryServicecalledinventoryservice.cfg. Paste this text into the file, changing the elements in Red:
[ req ]
	default_bits = 2048
	default_keyfile = rui.key
	distinguished_name = req_distinguished_name
	encrypt_key = no
	prompt = no
	string_mask = nombstr
	req_extensions = v3_req

	[ v3_req ]
	basicConstraints = CA:FALSE
	keyUsage = digitalSignature, keyEncipherment, dataEncipherment
	extendedKeyUsage = serverAuth, clientAuth
	subjectAltName = DNS:ServerShortName, IP:ServerIPAddress, DNS:server.domain.com

	[ req_distinguished_name ]
	countryName = Country
	stateOrProvinceName = State
	localityName = City
	0.organizationName = Company Name
	organizationalUnitName = vCenterInventoryService
	commonName = server.domain.com
- For vCenter Single Sign-On (SSO), create a file in
C:\certs\SSOcalledsso.cfg. Paste this text into the file, changing the elements in Red:
[ req ]
	default_bits = 2048
	default_keyfile = rui.key
	distinguished_name = req_distinguished_name
	encrypt_key = no
	prompt = no
	string_mask = nombstr
	req_extensions = v3_req

	[ v3_req ]
	basicConstraints = CA:FALSE
	keyUsage = digitalSignature, keyEncipherment, dataEncipherment
	extendedKeyUsage = serverAuth, clientAuth
	subjectAltName = DNS:ServerShortName, IP:ServerIPAddress, DNS:server.domain.com

	[ req_distinguished_name ]
	countryName = Country
	stateOrProvinceName = State
	localityName = City
	0.organizationName = Company Name
	organizationalUnitName = vCenterSSO
	commonName = server.domain.com
- For the VirtualCenter Server Service, create a file in
C:\certs\vCentercalledvcenter.cfg. Paste this text into the file, changing the elements in Red:
[ req ]
	default_bits = 2048
	default_keyfile = rui.key
	distinguished_name = req_distinguished_name
	encrypt_key = no
	prompt = no
	string_mask = nombstr
	req_extensions = v3_req

	[ v3_req ]
	basicConstraints = CA:FALSE
	keyUsage = digitalSignature, keyEncipherment, dataEncipherment
	extendedKeyUsage = serverAuth, clientAuth
	subjectAltName = DNS:ServerShortName, IP:ServerIPAddress, DNS:server.domain.com

	[ req_distinguished_name ]
	countryName = Country
	stateOrProvinceName = State
	localityName = City
	0.organizationName = Company Name
	organizationalUnitName = vCenterServer
	commonName = server.domain.com
- For the vSphere Web Client, create a file in
C:\certs\WebClientcalledwebclient.cfg. Paste this text into the file, changing the elements in Red:
[ req ]
	default_bits = 2048
	default_keyfile = rui.key
	distinguished_name = req_distinguished_name
	encrypt_key = no
	prompt = no
	string_mask = nombstr
	req_extensions = v3_req

	[ v3_req ]
	basicConstraints = CA:FALSE
	keyUsage = digitalSignature, keyEncipherment, dataEncipherment
	extendedKeyUsage = serverAuth, clientAuth
	subjectAltName = DNS:ServerShortName, IP:ServerIPAddress, DNS:server.domain.com

	[ req_distinguished_name ]
	countryName = Country
	stateOrProvinceName = State
	localityName = City
	0.organizationName = Company Name
	organizationalUnitName = vCenterWebClient
	commonName = server.domain.com
- For the VMware Log Browser, create a file in
C:\certs\LogBrowsercalledLogBrowser.cfg. Paste this text into the file, changing the elements in Red:
[ req ]
	default_bits = 2048
	default_keyfile = rui.key
	distinguished_name = req_distinguished_name
	encrypt_key = no
	prompt = no
	string_mask = nombstr
	req_extensions = v3_req

	[ v3_req ]
	basicConstraints = CA:FALSE
	keyUsage = digitalSignature, keyEncipherment, dataEncipherment
	extendedKeyUsage = serverAuth, clientAuth
	subjectAltName = DNS:ServerShortName, IP:ServerIPAddress, DNS:server.domain.com

	[ req_distinguished_name ]
	countryName = Country
	stateOrProvinceName = State
	localityName = City
	0.organizationName = Company Name
	organizationalUnitName = vCenterLogBrowser
	commonName = server.domain.com
- For vSphere Update Manager, create a file in
C:\certs\UpdateManagercalledUpdateManager.cfg. Paste this text into the file, changing the elements in Red:
[ req ]
	default_bits = 2048
	default_keyfile = rui.key
	distinguished_name = req_distinguished_name
	encrypt_key = no
	prompt = no
	string_mask = nombstr
	req_extensions = v3_req

	[ v3_req ]
	basicConstraints = CA:FALSE
	keyUsage = digitalSignature, keyEncipherment, dataEncipherment
	extendedKeyUsage = serverAuth, clientAuth
	subjectAltName = DNS:ServerShortName, IP:ServerIPAddress, DNS:server.domain.com

	[ req_distinguished_name ]
	countryName = Country
	stateOrProvinceName = State
	localityName = City
	0.organizationName = Company Name
	organizationalUnitName = VMwareUpdateManager
	commonName = server.domain.com
- For vRealize Orchestrator, create a file in
C:\certs\OrchestratorcalledOrchestrator.cfg. Paste this text into the file, changing the elements in Red:
[ req ]
	default_bits = 2048
	default_keyfile = rui.key
	distinguished_name = req_distinguished_name
	encrypt_key = no
	prompt = no
	string_mask = nombstr
	req_extensions = v3_req

	[ v3_req ]
	basicConstraints = CA:FALSE
	keyUsage = digitalSignature, keyEncipherment, dataEncipherment
	extendedKeyUsage = serverAuth, clientAuth
	subjectAltName = DNS:ServerShortName, IP:ServerIPAddress, DNS:server.domain.com

	[ req_distinguished_name ]
	countryName = Country
	stateOrProvinceName = State
	localityName = City
	0.organizationName = Company Name
	organizationalUnitName = VMwareOrchestrator
	commonName = server.domain.com
Generating certificate requests manually
Once OpenSSL has been configured, you must generate a certificate request for each of the components.To generate the certificate requests:
- Launch a command prompt and navigate to the OpenSSL directory. By default, this is
C:\OpenSSL-Win32\bin. - Run this command to create the Inventory Service certificate request and export the private key:
openssl req -new -nodes -out c:\certs\InventoryService\rui.csr -keyout c:\certs\InventoryService\rui-orig.key -config c:\certs\InventoryService\inventoryservice.cfg
- Convert the key to be in the proper RSA format for the Inventory Service to use:
openssl rsa -in c:\certs\InventoryService\rui-orig.key -out c:\certs\InventoryService\rui.key
- Run this command to create the vCenter SSO certificate request and export the private key:
openssl req -new -nodes -out c:\certs\sso\rui.csr -keyout c:\certs\sso\rui-orig.key -config c:\certs\sso\sso.cfg
- Convert the key to be in the proper RSA format for vCenter Server SSO to use:
openssl rsa -in c:\certs\sso\rui-orig.key -out c:\certs\sso\rui.key
- Run this command to create the vCenter Server Service certificate request and export the private key:
openssl req -new -nodes -out c:\certs\vCenter\rui.csr -keyout c:\certs\vCenter\rui-orig.key -config c:\certs\vCenter\vcenter.cfg
- Convert the key to be in the proper RSA format for vCenter Server to use:
openssl rsa -in c:\certs\vCenter\rui-orig.key -out c:\certs\vCenter\rui.key
- Run this command to create the vSphere Web Client certificate request and export the private key:
openssl req -new -nodes -out c:\certs\WebClient\rui.csr -keyout c:\certs\WebClient\rui-orig.key -config c:\certs\WebClient\webclient.cfg
- Convert the key to be in the proper RSA format for the vSphere Web Client to use:
openssl rsa -in c:\certs\WebClient\rui-orig.key -out c:\certs\WebClient\rui.key
- Run this command to create the vSphere Log Browser certificate request and export the private key:
openssl req -new -nodes -out c:\certs\LogBrowser\rui.csr -keyout c:\certs\LogBrowser\rui-orig.key -config c:\certs\LogBrowser\logbrowser.cfg
- Convert the key to be in the proper RSA format for the Log Browser to use:
openssl rsa -in c:\certs\LogBrowser\rui-orig.key -out c:\certs\LogBrowser\rui.key
- Run this command to create the vSphere Update Manager certificate request and export the private key:
openssl req -new -nodes -out c:\certs\UpdateManager\rui.csr -keyout c:\certs\UpdateManager\rui-orig.key -config c:\certs\UpdateManager\updatemanager.cfg
- Convert the key to be in the proper RSA format for vSphere Update Manager to use:
openssl rsa -in c:\certs\UpdateManager\rui-orig.key -out c:\certs\UpdateManager\rui.key
- Run this command to create the vRealize Orchestrator certificate request and export the private key:
openssl req -new -nodes -out c:\certs\Orchestrator\rui.csr -keyout c:\certs\Orchestrator\rui-orig.key -config c:\certs\Orchestrator\Orchestrator.cfg
- Convert the key to be in the proper RSA format for vRealize Orchestrator to use:
openssl rsa -in c:\certs\Orchestrator\rui-orig.key -out c:\certs\Orchestrator\rui.key
rui.csr and rui.key files located in each of the respective directories for the different services. To validate that the CSR is created properly, you can run the command:openssl req -in rui.csr -noout -textAfter running the command, verify the output to ensure that all of the parameters entered in the
.cfg file are properly set.Proceed to the Obtaining the certificate section in the Resolution area of this article.
Deploying and using the SSL Certificate Automation Tool 1.0.x
Deploying and using the SSL Certificate Automation Tool 5.5
使用する証明書を VMware SSL Certificate Automation Tool で生成する
生成证书以与 VMware SSL 证书自动化工具结合使用
Feedback
Yes
No
Powered by
